As most people use Photoshop as image editing software, I designed a two-way interaction method between Photoshop
and the main application in order to achieve the goal of exporting the document to Photoshop automatically,
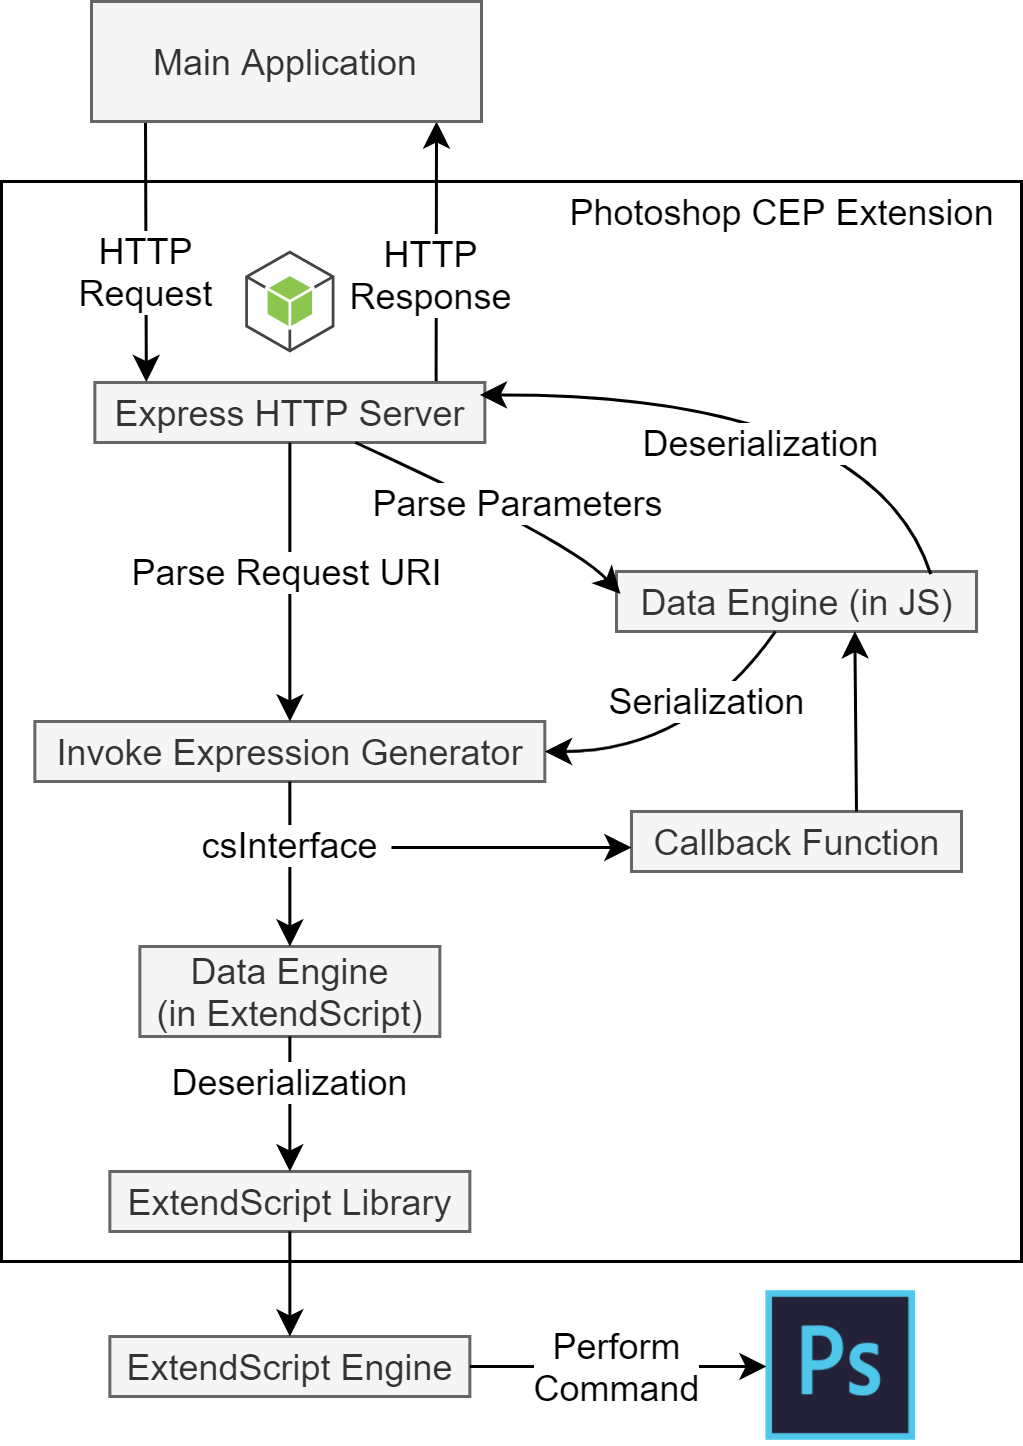
which can enable further customized editing. The design has two components: a Photoshop CEP extension and the
main application. The following diagram shows how the system works:

As CEP framework is based on Chromium, and Adobe provided a csInterface which can enable us to evaluate
ExtendScript expressions, I proposed the framework above, with the main idea of using HTTP server to communicate
with the main application.
关于 HTTP Server
根据 https://wttech.blog/blog/2020/creating-custom-extension-for-adobe-photoshop/ , 初始化node,安装相关库:
Working with Node.js in CEF client is really simple and straightforward and only requires 2 lines of configuration. In your manifest.xml under <Resources> just paste this lines:
<CEFCommandLine>
  <Parameter>--enable-nodejs</Parameter>
  <Parameter>--mixed-context</Parameter>
</CEFCommandLine>--enable-nodejs- it enables Node.js in the Chromium. Thanks to that you can use all of Node.js API without any custom configuration. This configuration can be summarized with a famous cite by Todd Howard from Bethesda Games Studio - It just works!--mixed-context- it enables working with mixed content in the Chromium so you will not get any unexpected errors
It should look like this:
...
<Resources>
  <MainPath>./index.html</MainPath>
  <CEFCommandLine>
    <Parameter>--enable-nodejs</Parameter>
    <Parameter>--mixed-context</Parameter>
  </CEFCommandLine>
</Resources>
...
安装相关库
npm install express接下来该怎么写怎么写,详见:https://github.com/JeffersonQin/YuzuMarker.Photoshop
关于 JS 调用 ExtendScript
我写了一个正则匹配来转义参数:
function repr(val) {
    return val.replace(/\\/g, '\\\\').replace(/\'/g, '\\\'').replace(/\"/g, '\\\"').replace(/\n/g, '\\n').replace(/\t/g, '\\t').replace(/\r/g, '\\r').replace(/\&/g, '\\\&');
}
使用样例:
-
首先初始化
CSInterface:var csInterface = new CSInterface(); -
在 ExtendScript 中写好相关逻辑 (无关紧要)
cTID = function(s) { return app.charIDToTypeID(s); }; sTID = function(s) { return app.stringIDToTypeID(s); }; function applyMask() { function step1(enabled, withDialog) { if (enabled != undefined && !enabled) return; var dialogMode = (withDialog ? DialogModes.ALL : DialogModes.NO); var desc1 = new ActionDescriptor(); desc1.putClass(cTID('Nw '), cTID('Chnl')); var ref1 = new ActionReference(); ref1.putEnumerated(cTID('Chnl'), cTID('Chnl'), cTID('Msk ')); desc1.putReference(cTID('At '), ref1); desc1.putEnumerated(cTID('Usng'), cTID('UsrM'), cTID('RvlS')); executeAction(sTID('make'), desc1, dialogMode); }; try { step1(); return 'success'; } catch (err) { return err.description; } } function performSelection(points) { function step1(enabled, withDialog, pointsObj) { if (enabled != undefined && !enabled) return; var dialogMode = (withDialog ? DialogModes.ALL : DialogModes.NO); var desc1 = new ActionDescriptor(); var ref1 = new ActionReference(); ref1.putProperty(cTID('Chnl'), sTID("selection")); desc1.putReference(cTID('null'), ref1); var desc2 = new ActionDescriptor(); var list1 = new ActionList(); for (var i = 0; i < pointsObj.length; i ++) { var point = new ActionDescriptor(); point.putUnitDouble(cTID('Hrzn'), cTID('#Pxl'), pointsObj[i].x); point.putUnitDouble(cTID('Vrtc'), cTID('#Pxl'), pointsObj[i].y); list1.putObject(cTID('Pnt '), point); } desc2.putList(cTID('Pts '), list1); desc1.putObject(cTID('T '), cTID('Plgn'), desc2); desc1.putBoolean(cTID('AntA'), true); executeAction(sTID('set'), desc1, dialogMode); }; try { step1(true, true, JSON.parse(points)); return 'success'; } catch (err) { return err.description; } } -
使用的例子:
 csInterface.evalScript("applyMask()", (ret) => {
     if (ret == 'success') {
         onSuccess(req, res, {}, '生成蒙版成功');
     } else {
         onFail(req, res, ret, '生成蒙版失败');
     }
 });

 csInterface.evalScript("performSelection('" + repr(params['points']) + "')", (ret) => {
     if (ret == 'success') {
         onSuccess(req, res, {}, '区域选择成功');
     } else {
         onFail(req, res, ret, '区域选择失败');
     }
 });
总结
本文不对代码做过多解释,详见官方文档,主要对整体架构做一定的讨论。
