Preface
答辩PPT需要画流程图,遂学。
方法
注
注:本文大部分为Overleaf的翻译与总结
这个由五部分组成的系列文章结合了视频和文字说明,以教授使用TikZ创建LaTeX图形的基础。这些教程于2013年8月首次在原始ShareLateX博客网站上发布;因此,由于ShareLaTeX的发展以及ShareLaTeX和Overleaf的合并,今天的编辑器界面(Overleaf)发生了很大变化。但是,许多内容仍然有意义,并会教给您一些基本的LaTeX,这些技能和专业知识将适用于所有平台。
此外,多年来,用于定位节点的TikZ库和方法已经发生了变化。如果您今天正在学习TikZ,则最好使用该
positioning库以below=of的语法放置节点。该positioning库语法是更灵活和强大。below of=以下视频和示例中使用的较旧样式的语法已正式弃用,但仍然可以使用。此外,arrows现在不建议使用该库,而希望使用较新的arrows.meta库。这里使用的其他TikZ命令和库可能具有更现代的等效项。在我们制作新的视频教程之前,我们将按原样保留代码示例,以便它们与视频内容相对应。
样例
宏包的引用:
\usepackage{tikz}
\usetikzlibrary{shapes,arrows}
\usetikzlibrary{shapes.geometric, arrows}
定义流程图的组件样式:
\tikzstyle{startstop} = [rectangle,rounded corners, minimum width=3cm,minimum height=1cm,text centered, draw=black,fill=red!30]
\tikzstyle{io} = [trapezium, trapezium left angle = 70,trapezium right angle=110,minimum width=3cm,minimum height=1cm,text centered,draw=black,fill=blue!30]
\tikzstyle{process} = [rectangle,minimum width=3cm,minimum height=1cm,text centered,text width =3cm,draw=black,fill=orange!30]
\tikzstyle{decision} = [diamond,minimum width=3cm,minimum height=1cm,text centered,draw=black,fill=green!30]
\tikzstyle{arrow} = [thick,->,>=stealth]
画流程图:
\begin{tikzpicture}[node distance=2cm]
\node (start) [startstop] {Start};
\node (input1) [io,below of=start] {Input};
\node (process1) [process,below of=input1] {Process 1};
\node (decision1) [decision,below of=process1,yshift=-0.5cm] {Decession 1};
\node (process2a) [process,below of=decision1,yshift=-0.5cm] {Process 2aaaaaa aaaaaaa aaaa};
\node (process2b) [process,right of =decision1,xshift=2cm] {Process 2b};
\node (out1) [io,below of=process2a] {Output};
\node (stop) [startstop,below of=out1] {Stop};
\draw [arrow] (start) -- (input1);
\draw [arrow] (input1) -- (process1);
\draw [arrow] (process1) -- (decision1);
\draw [arrow] (decision1) -- node[anchor=east] {yes} (process2a);
\draw [arrow] (decision1) -- node[anchor=south] {no} (process2b);
\draw [arrow] (process2b) |- (process1);
\draw [arrow] (process2a) -- (out1);
\draw [arrow] (out1) -- (stop);
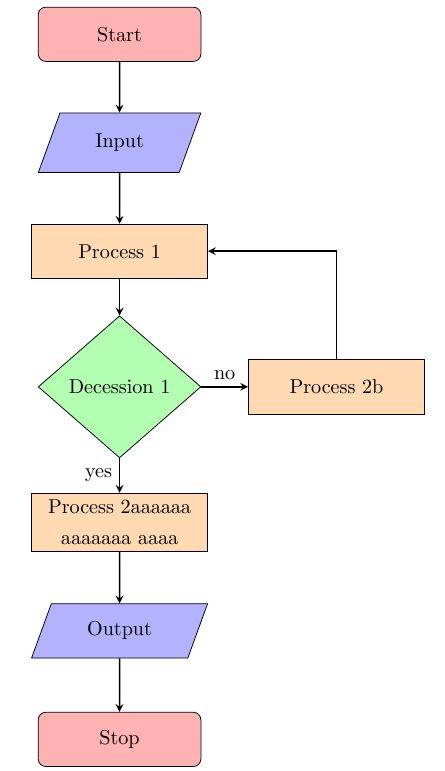
\end{tikzpicture}结果:

某些可选参数
箭头样式
\tikzstyle{arrow} = [thick,->,>=stealth]解析:
# 线粗:
thick:粗
thin:细
# 箭头
-> : 正向箭头
<- : 反向箭头
<-> : 双向箭头
# 虚线
dashed
# 箭头形状
>=stealth
画箭头
\draw [arrow] (decision1) -- node[anchor=east] {yes} (process2a);解析:
# 属性
[arrow]: 需要调用的箭头的样式名称
(decision1):箭头的起始节点名称
(process2a):箭头的末端节点名称
# 线型
--:直线
|-:先竖线后横线
-|:向横线后竖线
# 文字:如果需要在箭头上添加文字
{yes}: 需要添加的文字
# 文字的位置,上南下北左东右西(与地图方位不一致)
[anchor=east]
[anchor=south]
[anchor=west]
[anchor=north]
[anchor=center]
节点样式
\tikzstyle{process} = [rectangle,minimum width=3cm,minimum height=1cm,text centered,text width =3cm,draw=black,fill=orange!30]解析:
# 节点形状
rectangle: 矩形,可加圆角(rounded corners)
trapezium: 平行四边形
diamond: 菱形
# 尺寸
minimum width
minimum height
# 文本
text centered: 文本居中
# 文本宽度
text width=3cm: 文本超过3cm时会自动换行
# 边框
draw
# 填充颜色
fill
画节点
\node (decision1) [decision,below of=process1,yshift=-0.5cm] {Decession 1};解析:
# name
(decision1):这个节点的name,后面需要用这个name调用这个节点。
# 属性
decision:需要调用的节点的样式名称
# 位置
below of=process1:定义节点的位置
left of:
right of:
# 偏移,对位置进行微调
yshift:
xshift:
# title
{Decession 1}: 结果显示的标题
总结
类似于css的思想,这个其实就是先定义一下样式然后调用,调用的时候也可以修改,大多数参数也能猜(确信