除夕夜的静谧 - VSCode插件开发:LaTeX Snippets
写在前面
这个项目是在20年春节前夕想到的。那时候正在需要非常频繁地键入数学公式,一开始使用的编辑器是Typora,但是越到后面,基础功能已经不再能满足需求。我开发出了一套Keyboard Maestro的快捷键来加快写作速度,但是不同模式的频繁切换反而降低了效率,再加之markdown中LaTeX的限制,便转身投靠了MacTeX。本想要借助某位国外大神的LaTeX+Vim+Snippets的设计进行自动化写作,但是在Mac环境下的配置失败而引发的一系列惨剧让我终止了这个计划。于是我便使用了VSCode+LaTeX+Plugin的方案。但是很多我想要的Snippets都没有而且也不能做到个性化的自定义,我便尝试编写一个Plugin达到此功能。于是,我前前后后花了五六天的时间完成了这个项目,在大年初二发布了。P.S. 正巧在前些天看了mcy大佬的博客(关于Linux下Vim+LaTeX的配置),准备过两天拿手边的rPi去尝试一下。
在此,特别感谢对此项目提供帮助的yjc大佬(深夜帮忙查js的bug),wyy大佬(对图标设计提供的意见),以及wsj、wrl、jdh等GitHub的star。
整个项目的工程文件也在我的Github上:https://github.com/JeffersonQin/VSCode-LaTeX-Snippets
另外特别感谢一篇博客:https://www.cnblogs.com/liuxianan/p/vscode-plugin-overview.html
,其给予了我巨大的帮助
插件下载
此项目已经发布在了marketplace上:https://marketplace.visualstudio.com/items?itemName=JeffersonQin.latex-snippets-jeff
,大家可以下载安装。
项目概述
此项目主要想要完成的功能是对tex文件编辑下的Snippets做一些扩展,即增加一些自动补全功能。同时,还提供了对函数作图的图形界面的功能。
准备工作
首先是开发环境的安装。通过微软官方的vscode-generator-code来安装。
首先保证安装好了npm和vscode,打开终端,运行:
npm install -g yo generator-code以此来安装generator。
生成项目
打开terminal并定位到目标文件夹,运行:
yo code虽然我们开发的是Snippets插件,但是还会需要用到别的功能,所以选择的时候选择开发完整的功能,语言我选了JavaScript(TypeScript也差不多)
配置package.json
项目的大部分设置内容都在package.json当中,我们重点需要对以下内容进行配置:
displayname:插件在marketplace上显示的名称description:插件描述publisher:发布者categories:种类,这里选的是SnippetsactionEvents:哪些时间可以激活扩展,我这里是["*"],意思是全局激活main:插件的主入口(一般不需要修改)contributes:插件主要做的一些事,在稍后的部分我们会去修改repository:代码仓库,我的配置:"repository": { "type": "git", "url": "https://github.com/JeffersonQin/LaTeX-Snippets-Jeff" }homepage:主页(我是用的是GitHub主页)icon:图标路径(项目中的相对路径)
编写Snippets
此项目的本意是要增加一些Snippets,所以我决定先把这个主要工作完成。在项目的根目录下新建文件夹snippets,并在当中新建文件:latex.json。
Snippets就编写在这个json文件当中,以下为文件的结构:
{
    "SNIPPET_NAME": {
        "prefix": ["PREFIX_1", "PREFIX_2", ... ],
        "body": [
            "LINE_1", "LINE_2", ...
        ],
        "description": "DESCRIPTION"
    }, ...
}
解释:
- 在
SNIPPET_NAME的部分填入Snippet的名称 prefix就是输入什么才能触发Snippets的数组body就是代码片段内容的数组description就是Snippets的描述- 在
PREFIX_1等的部分填入各个不同的缩写 - 在
LINE_1等部分填入各行内容,顺次排列
占位符
复杂的代码片段会使用到占位符,占位符形如:${1:xxx}, ${2:xxx}, ..., 顺序按照数字顺次排列,每个占位符中的xxx为占位符的实例内容,结束位置的占位符为$0。
比如我的LaTeX数学环境的Snippets就是:
"Centered Math": {
    "prefix": ["mathcentered", "\\mathcentered"],
    "body": [
        "$$ $0 $$"
    ],
    "description": "Insert centered Math Environment."
}
其中用到了结束占位符。
另外,我还是用到了一种较为特殊的占位符--选择占位符--顾名思义其可以让用户在几个选项中做出选择。下面就是我用到的一个Snippet:
"Create 2D Plot environment": {
    "prefix": ["plotenvironment2d", "\\plotenvironment2d"],
    "body": [
        "\\begin{tikzpicture}",
        "\\begin{axis}[",
        "legend pos=outer north east,",
        "title=${1:Example},",
        "axis lines =${2| box, left, middle, center, right, none|},",
        "xlabel = \\$x\\$,",
        "ylabel = \\$y\\$,",
        "variable = t,",
        "trig format plots = rad,",
        "]",
        "$3",
        "\\end{axis}",
        "\\end{tikzpicture}$0"
    ],
    "description": "Create a 2DPlot Environment of pgfplots. The style declarations are already included in the snippet."
}其中${2| box, left, middle, center, right, none|}便是指用户可以在box, left, middle, center, right, none中做出选择。
还有一些其他的占位符,包括会用到系统的VARIABLE,正则表达式匹配,等。但是在我的项目中并没有使用到,这一也不再做介绍了。这个是官方的documentation:https://code.visualstudio.com/docs/editor/userdefinedsnippets
接下来我们将要在package.json中做配置:找到之前提到的"contribute",在"snippets"中(如果没有就创建)添加:
{
    "language": "latex",
    "path": "./snippets/latex.json"
}
在我这里长这样:
"contributes": {
    "snippets": [
        {
            "language": "latex",
            "path": "./snippets/latex.json"
        }
    ],
    ...
}
Snippet功能的测试
点击页面左侧的测试按钮(形状像小虫子),点击运行就可以进行测试。测试会在一个行的VSCode页面进行,标题为扩展开发宿主。我们可以在tex文件中进行测试。
编写函数绘图辅助工具
因为学校上AP Calc时,老师经常会比较随性地画一些曲线来说明,这就给了我灵感来做一个函数绘图的辅助工具。过程是这样的:在平面上点击了一些点之后,选择次数,就可以进行多项式拟合。原理也比较简单,就是解高次方程组,或者可以将问题转化为Linear Regression。
这里使用VSCode的WebView来编写此功能(HTML5+CSS3+JS)。
因为代码量肯定不会小,加之第一次使用JS,生怕翻车,我就上GitHub上找到了一个库:js-polynomial-regression Github Link.
本来我想按照常规的方法npm安装然后引用的,但是报错始终修不了,于是我就将其所有代码全部放在了js文件当中。
DOM事件
在VSCode中,DOM事件入口:
window.addEventListener('DOMContentLoaded', () => {

}
和页面相关的内容全部写在这个接口内。
VSCode与WebView的通讯
这里我使用了封装好的接口
在网页的js文件当中:
const testMode = false; // 为true时可以在浏览器打开不报错
// vscode webview 网页和普通网页的唯一区别:多了一个acquireVsCodeApi方法
const vscode = testMode ? {} : acquireVsCodeApi();

/**
 * 调用vscode原生api
 * @param data 可以是类似 {cmd: 'xxx', param1: 'xxx'},也可以直接是 cmd 字符串
 * @param cb 可选的回调函数
 */
function callVscode(data, cb) {
    if (typeof data === 'string') {
        data = { cmd: data };
    }
    if (cb) {
        // 时间戳加上5位随机数
        const cbid = Date.now() + '' + Math.round(Math.random() * 100000);
        callbacks[cbid] = cb;
        data.cbid = cbid;
    }
    vscode.postMessage(data);
}
在extension.js当中:
// The module 'vscode' contains the VS Code extensibility API
// Import the module and reference it with the alias vscode in your code below
const vscode = require('vscode');
const fs = require('fs');
const path = require('path');
const util = require('./util');
// this method is called when your extension is activated
// your extension is activated the very first time the command is executed

/**
 * 从某个HTML文件读取能被Webview加载的HTML内容
 * @param {*} context 上下文
 * @param {*} templatePath 相对于插件根目录的html文件相对路径
 */
function getWebViewContent(context, templatePath) {
    const resourcePath = util.getExtensionFileAbsolutePath(context, templatePath);
    const dirPath = path.dirname(resourcePath);
    let html = fs.readFileSync(resourcePath, 'utf-8');
    // vscode不支持直接加载本地资源,需要替换成其专有路径格式,这里只是简单的将样式和JS的路径替换
    html = html.replace(/(<link.+?href="|<script.+?src="|<img.+?src=")(.+?)"/g, (m, $1, $2) => {
        return $1 + vscode.Uri.file(path.resolve(dirPath, $2)).with({ scheme: 'vscode-resource' }).toString() + '"';
    });
    return html;
}

/**
 * 执行回调函数
 * @param {*} panel
 * @param {*} message
 * @param {*} resp
 */
function invokeCallback(panel, message, resp) {
    console.log('Invoke call back: ', resp);
    // 错误码在400-600之间的,默认弹出错误提示
    if (typeof resp == 'object' && resp.code && resp.code >= 400 && resp.code < 600) {
        util.showError(resp.message || 'Unknown error occurred!');
    }
    panel.webview.postMessage({cmd: 'vscodeCallback', cbid: message.cbid, data: resp});
}
/**
 * 存放所有消息回调函数,根据 message.cmd 来决定调用哪个方法
 */
const messageHandler = {
    // 弹出提示
    alert(message) {
        util.showInfo(message.info);
    },
    // 显示错误提示
    error(message) {
        util.showError(message.info);
    },
    // 获取工程名
    getProjectName(global, message) {
        invokeCallback(global.panel, message, util.getProjectName(global.projectPath));
    },
    openFileInFinder(global, message) {
        util.openFileInFinder(`${global.projectPath}/${message.path}`);
        // 这里的回调其实是假的,并没有真正判断是否成功
        invokeCallback(global.panel, message, {code: 0, text: '成功'});
    },
    openFileInVscode(global, message) {
        util.openFileInVscode(`${global.projectPath}/${message.path}`, message.text);
        invokeCallback(global.panel, message, {code: 0, text: '成功'});
    },
    openUrlInBrowser(global, message) {
        util.openUrlInBrowser(message.url);
        invokeCallback(global.panel, message, {code: 0, text: '成功'});
    }
};

/**
 * @param {vscode.ExtensionContext} context
 */
function activate(context) {
    context.subscriptions.push(vscode.commands.registerCommand('extension.openWebview', function (uri) {
        const panel = vscode.window.createWebviewPanel(
            'testWebview', // viewType
            "Plot", // 视图标题
            vscode.ViewColumn.Beside, // 显示在编辑器的哪个部位
            {
                enableScripts: true, // 启用JS,默认禁用
                retainContextWhenHidden: true, // webview被隐藏时保持状态,避免被重置
            }
        );
        // let global = { projectPath, panel};
        panel.webview.html = getWebViewContent(context, 'src/plotDots.html');
        panel.webview.onDidReceiveMessage(message => {
            // 通讯入口
            if (messageHandler[message.cmd]) {
                messageHandler[message.cmd](message);
            } else {
                util.showError(`Invoking method named ${message.cmd} not found!`);
            }
        }, undefined, context.subscriptions);
    }));

}这里还用到了辅助文件util.js来自文章开头所引用的博客,确实帮助我们减轻了很多工作量,具体代码在我的GitHub上可以看到。
在package.json中完成注册
最终,package.json中contributes变成:
"contributes": {
    "snippets": [
        {
            "language": "latex",
            "path": "./snippets/latex.json"
        }
    ],
    "commands": [
        {
            "title": "LaTeX Plotting Tool",
            "command": "extension.openWebview"
        }
    ]
},
发布
发布和打包需要用到vsce
安装工具
npm i vsce -g创建Azure账号
可以使用Microsoft账号或者GitHub账号登录:https://aka.ms/SignupAzureDevOps
创建Personal Access Token
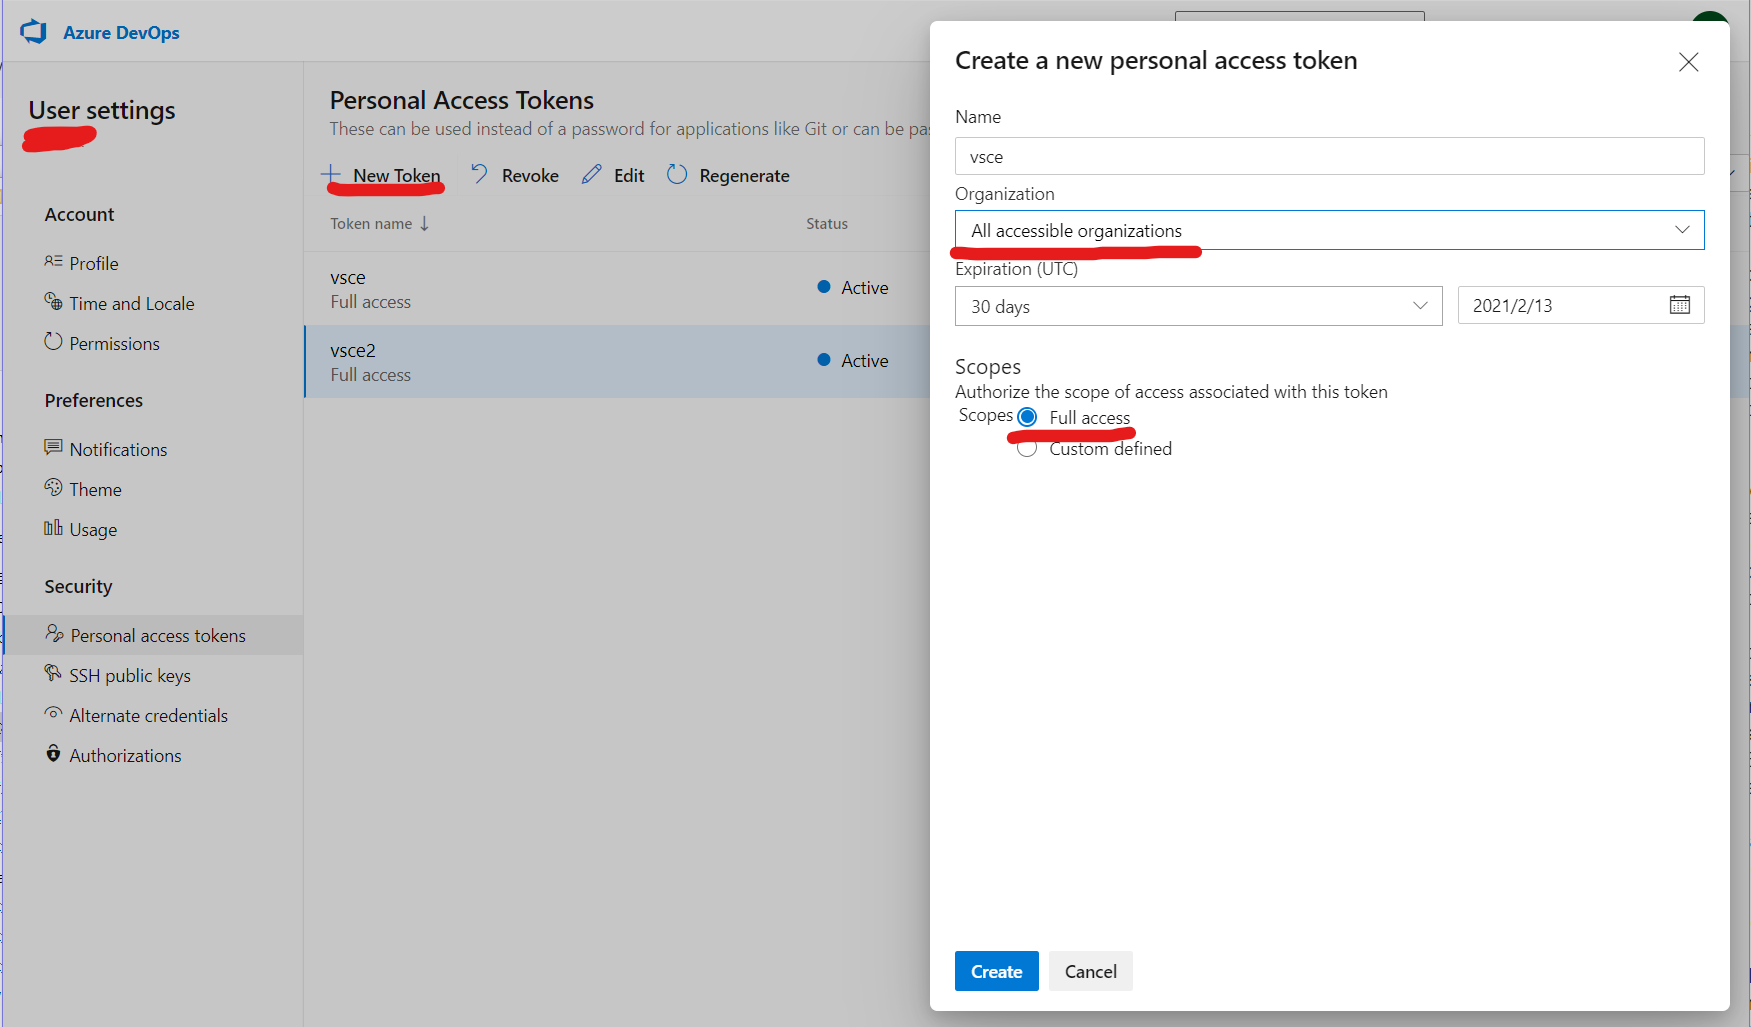
点击页面上方的人形图标(右下角有齿轮形状),找到「Personal Access Tokens」并点击。创建Personal Access Tokens,注意:
- name:vsce
- Organization:
All Accessible Organizations - Scopes:
Full Access
之后你需要把这个Token记下来,网站是不会保存的。
name和expiration的设置比较随意,大家量力而行。
使用vsce创建新的发布者
vsce create-publisher your-publisher-name其中,your-publisher-name是你要创建的发布者的名字。之后会要求填入:
- Publisher Human-friendly name: 发布者的显示名称
- E-mail: 邮箱
- Personal Access Token: 之前的Token
发布
vsce publish注意事项
README.md文件默认会显示在插件主页;
README.md中的资源必须全部是HTTPS的,如果是HTTP会发布失败;
CHANGELOG.md会显示在变更选项卡;
如果代码是放在git仓库并且设置了repository字段,发布前必须先提交git,否则会提示Git working directory not clean;


